Patchwork Star
When I first joined the Flickr community back in the spring of 2008, it actually had nothing to do with sewing. I had just discovered that there was a large and vibrant bunch of people who were as obsessed with thrifting and vintage Pyrex as I was, and the Pyrex Love group became a daily stop for me. Jeni’s enviable collection and gorgeous photos stood out from the group, so I started following her photostream and her blog, In Color Order . I had barely sewn anything in years (an architecture degree doesn’t leave much time for sleeping, let alone extracurricular interests), and the last quilt I had made was from 2002, but when Jeni started posting pictures of gorgeous stacks of fabric and stunning quilts my interest was reawakened. So Mum, if you’re reading this, the fabric stash is all Jeni’s fault… ;)
In the past few years, Jeni has become a serious force in the online sewing community, so I was thrilled when she agreed to take some time out from her other obligations, such as her blog, her lovely shop, her current quilt-along with Megan and the handsome George, to join us for a guest post. Thanks so much, Jeni!
Here we go!
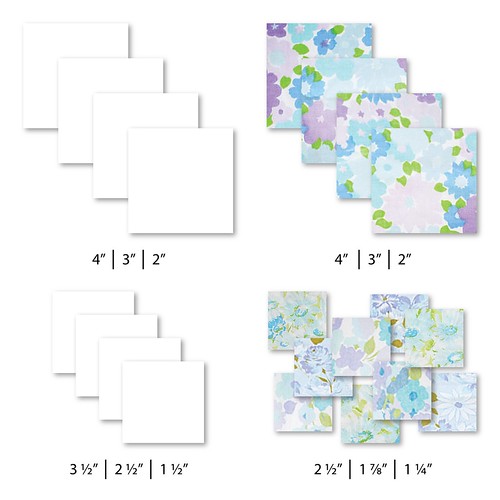
To begin, we’re going to cut all the required pieces. For this block you’ll need twenty one (21) pieces, according to the following dimensions:
First we’re going to piece the inner patchwork square. Layout your nine 2.5″ squares in a 3 x 3 arrangement.

Sew each row. Press the seams in alternating directions.

Sew rows together. Press seams open. At this point it would be a good idea to square up the 9-patch to 6.5″ before continuing with the rest of the block’s construction.

Now we’re going to sew the half-square triangles for our star points. Put a 4″ background square and a 4″ print square right sides together. Using a pencil and ruler, draw a diagonal line from one corner to the other. (Just as a reminder, if you’re looking for the other method for constructing the points, you can find it here.)

Stitch 1/4″ on both sides of the line you just drew. Cut along the line with scissors or a rotary cutter. Press the seam open. Trim to 3.5″.

Repeat with the remaining 4″ squares for a total of eight half-square triangles.

Arrange your pieces as shown below.

Sew both pairs of side half-square triangles together. Press the seams open.

Sew the side half-square triangle units to the center patchwork square and press the seams towards centre. Sew together the pieces for top row. Sew together the pieces for the bottom row. For each of the top and bottom units, press the centre seam open, and the side seams towards the outside.

Sew all three rows together. Press the seams open.

Voila! You’re done! :)

Thanks again, Jeni! There’s nothing quite like simple patchwork squares, is there?!
Now, just incase you find some of the dimensions for the 8″ and 4″ block difficult, or you just want to change things up a bit, I thought I’d throw in a little cheat sheet for using a 16-patch or a 4-patch as well as the 9-patch.

I’m sure there will be many lovely stars as a result of this tutorial!


Another nice variation. I have one more old project to get out of the way and then I am really getting started on this. My fabric is sitting in a beautiful pile begging for attention.
I can’t wait to try, just waiting for my Kona snow to arrive! Hopefully tomorrow…
Love it! I still have to get started on this…but the dust bunnies were calling my name–I need to finish vacuuming them up! LOL I also ran out of starch last night as I was pressing my fabric…so hope to finish that today.
So…..obvious as a variation….. but how gorgeous.I don’t feel quite as tired anymore so I may go and make some!
I like this variation on stars. And the walk though looks great. I like how it has a 9 block inside the 9 block pattern gives for all kinds of nice variations.
Yikes! I had better get back into these. I stumbled at the Frosted Tip ones … need to rethink the colors or just ditch them and keep moving forward :)
Please tell me why there are three measurements. Sorry I’m so slow to figure that out. It appears to be a square size. You have three sizes listed. Thanks.