Love Is Love
I spent most of Sunday, June 12 in blissful ignorance. I usually spend my sundays listening to CBC radio (The Sunday Edition, Spark, The Vinyl Cafe, Writers and Company…it’s the best lineup of the week) while getting things done around the house. But for whatever reason, I spent that day in contemplative silence. I didn’t turn the radio on, I didn’t check Facebook or Instagram, I didn’t read the headlines. Instead I read a book, and did some sewing, and spent a few hours outside with Stella.
It wasn’t until after dinner that I went online, and a cryptic post by a friend sent me to Google. As I read about the scale of the violence, about its motivation, I felt such despair. The hate expressed by the murderer in Orlando was for how people loved one another. How they LOVED.
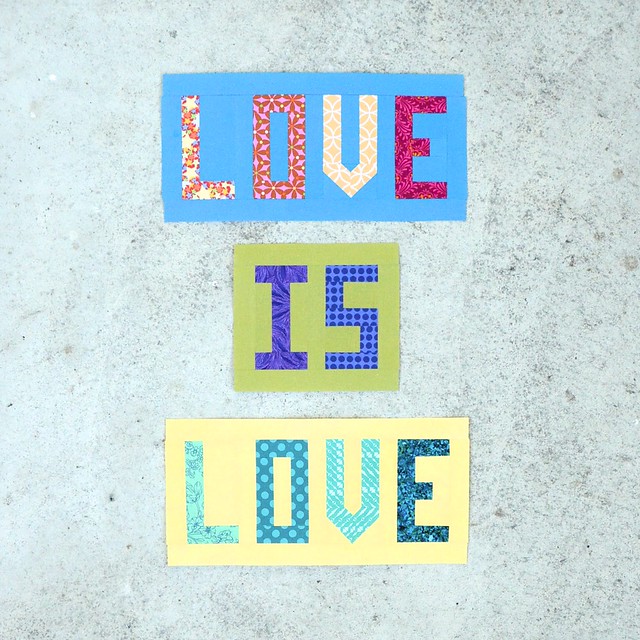
The idea for this quilt was almost immediate. A simple repeating phrase to emphasize the simplicity of the statement: LOVE IS LOVE. I’ve asked my fellow Toronto Modern Quilt Guild members to contribute blocks as well, because if ever a quilt needed to be a community effort, this is it. I hope this quilt, this small gesture in a very large world, will join with a million other small gestures to tip the balance on the side of love.
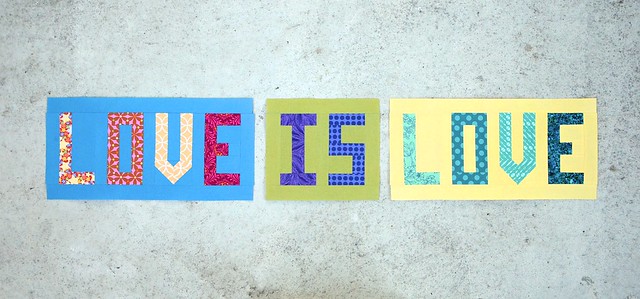
I would be thrilled if other people made blocks as well, so I’ve posted the pattern for the blocks here for others to follow. (If you end up making some, and want to share them on social media, feel free to tag them #loveislovequilt and #quiltsforpulse so that others can see them.)
The goal is to make these blocks in bold, bright colours. No black, white, grey, etc. It is also important that the letters be legible, so contrast between the letters and the background is important. You can achieve this in different ways, such as using a cool background and warm letters (or vice versa), or using a light background and dark letters (or vice versa). Generally, prints that are on the smaller side, and that don’t themselves have a lot of contrast within them, will work best. Make them as scrappy or as solid as you’d like, just keep them bright and cheerful!
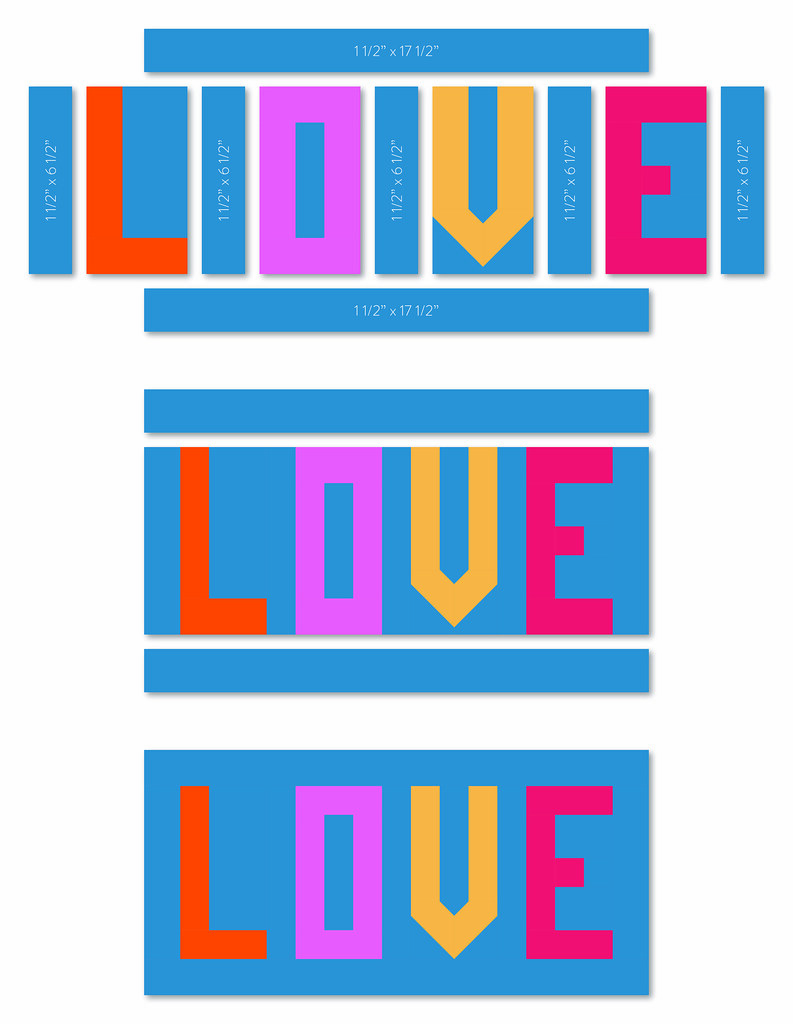
Each of the letters “finish” at 3″ x 6″, so they should be 3 1/2″ x 6 1/2″ before you join them all together. This is a good place to check your dimensions, since you can cut the joining pieces a bit thicker if you tend to find your seam allowances are a bit bigger than a scant quarter inch.
I pressed all my seams open, but do what works for you. As long as the blocks are the correct size when you’re done, how you got there doesn’t matter. :)
Ok, let’s get on with it!
LOVE
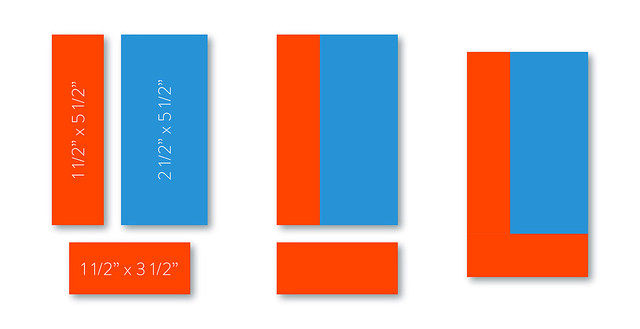
L
Main fabric:
1 – 1 1/2″ x 3 1/2″
1 – 1 1/2″ x 5 1/2″
Background fabric:
1 – 2 1/2″ x 5 1/2″
O
Main fabric:
2 – 1 1/2″ x 3 1/2″
2 – 1 1/2″ x 4 1/2″
Background fabric:
1 – 1 1/2″ x 4 1/2″

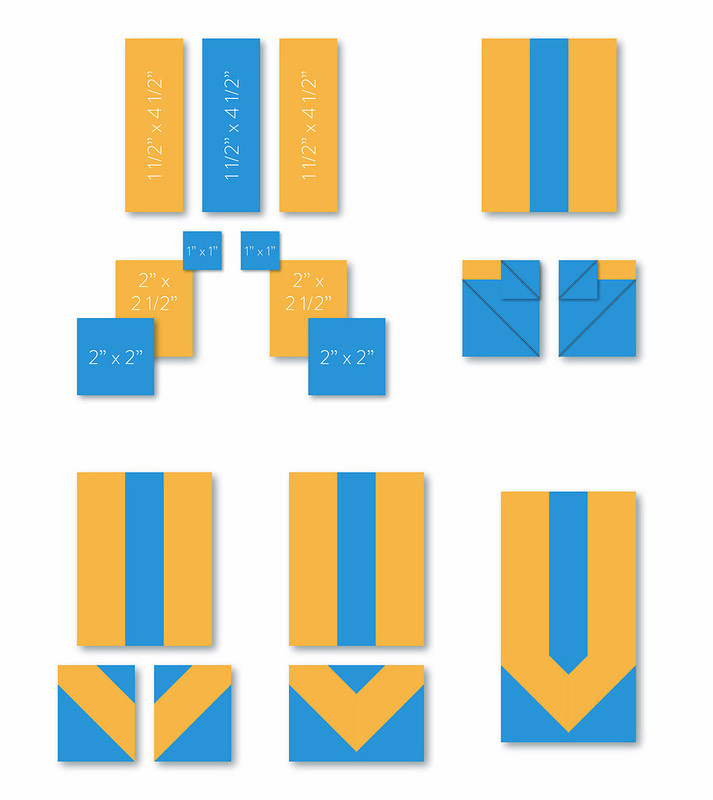
V
Main fabric:
2 – 2″ x 2 1/2″
2 – 1 1/2″ x 4 1/2″
Background fabric:
1 – 1 1/2″ x 4 1/2″
2 – 1″ x 1″
2 – 2″ x 2″
This is the only block that is a bit tricky. Draw chalk lines on the diagonal on the 4 squares of background fabric. Then put them on opposite corners of the main fabric pieces that are 2″ x 2 1/2″ (right sides together!), with the diagonal lines parallel to each other. You can see this in the second step of the diagram below. Then stitch along those lines, but ever-so-slightly shy of them, so that you end up with a scant seam. You can them trim the excess triangles before you move on to the next step.
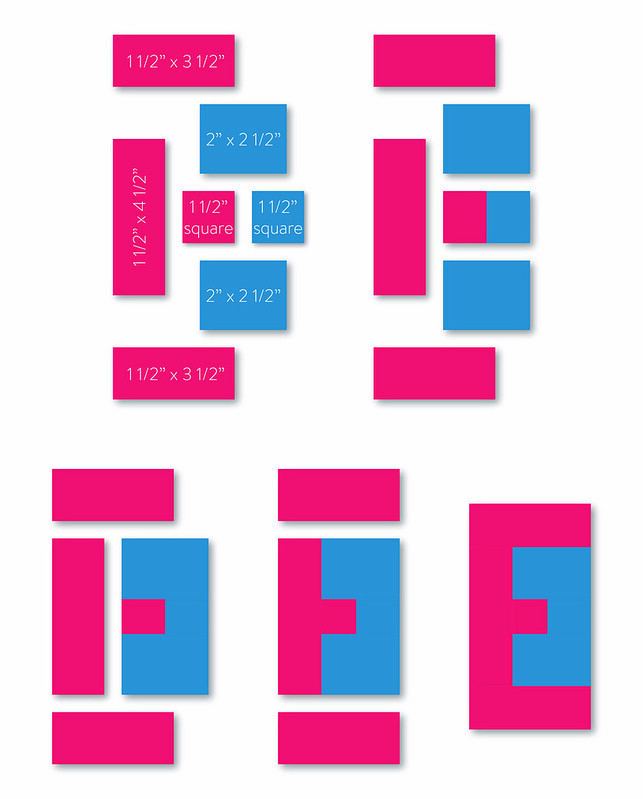
E
Main fabric:
2 – 1 1/2″ x 3 1/2″
1 – 1 1/2″ x 4 1/2″
1 – 1 1/2″ x 1 1/2″
Background fabric:
1 – 1 1/2″ x 1 1/2″
2 – 2″ x 2 1/2″
Putting it together
Background fabric:
5 – 1 1/2″ x 6 1/2″
2 – 1 1/2″ x 17 1/2″
The LOVE block finishes at 8″ x 17″, so yours will be 8 1/2″ x 17 1/2″. I would suggest joining the letters together first, without the last 4 border pieces, and then checking your size. At this point you should have a unit that is 6 1/2″ x 15 1/2″. If you’re a little shy, you can always cut those last four strips a bit wider to make up the difference.
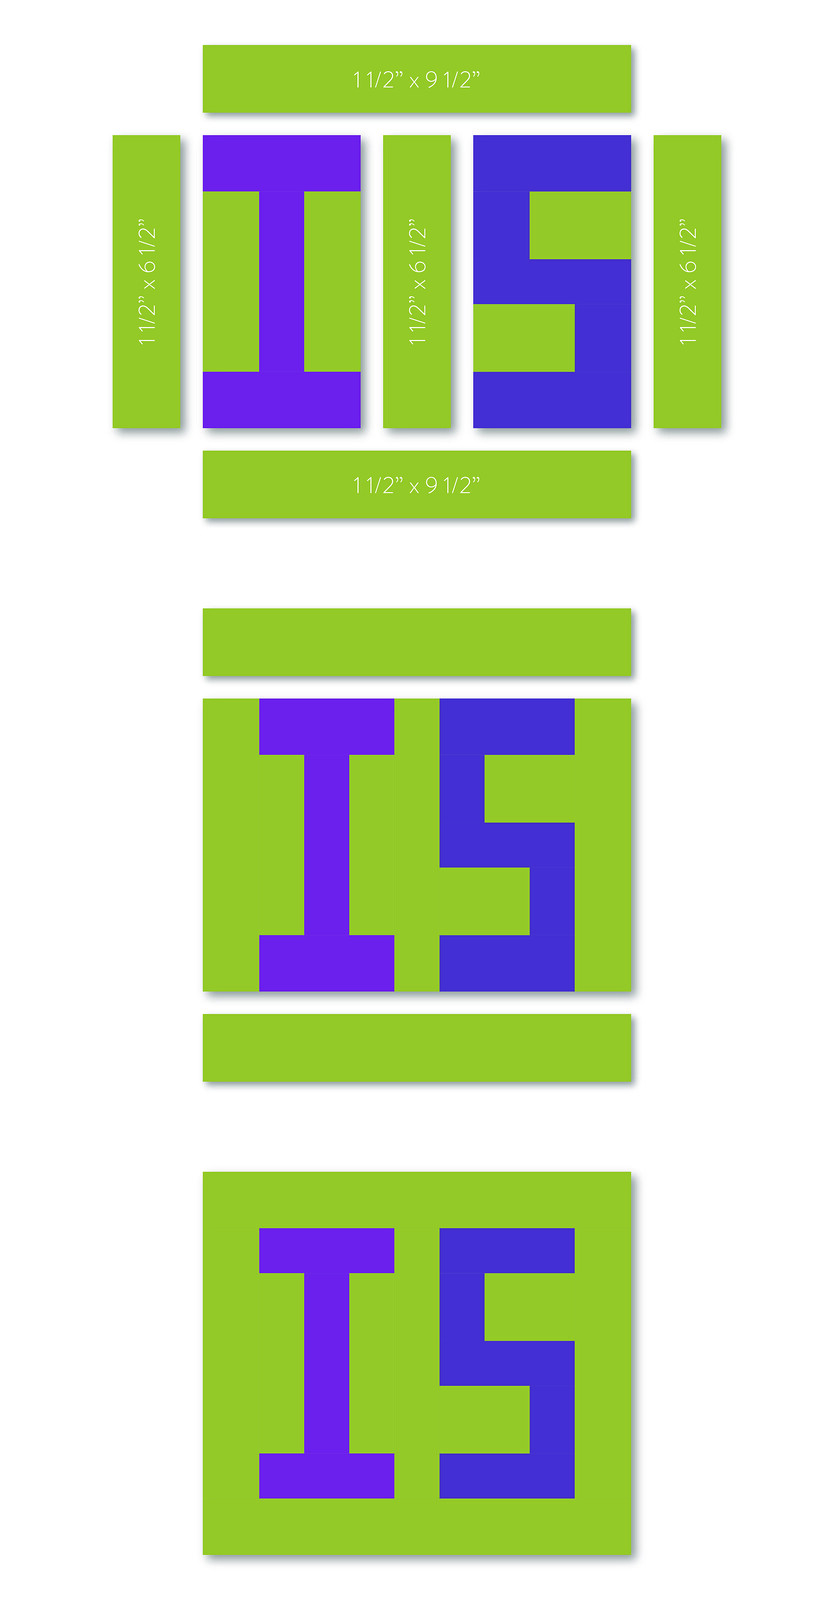
IS
I
Main fabric:
2 – 1 1/2″ x 3 1/2″
1 – 1 1/2″ x 4 1/2″
Background fabric:
2 – 1 1/2″ x 4 1/2″

S
Main fabric:
3 – 1 1/2″ x 3 1/2″
2 – 2″ x 1 1/2″
Background fabric:
2 – 2″ x 2 1/2″

Putting it together
Background fabric:
3 – 1 1/2″ x 6 1/2″
2 – 1 1/2″ x 9 1/2″
The IS block finishes at 8″ x 9″, so yours will be 8 1/2″ x 9 1/2″. Just as with the LOVE block, you can check your size at this point: you should have a unit that is 6 1/2″ x 7 1/2″. Again, if you’re a little shy, you can cut the last four strips a bit wider to make up the difference.
And that’s it! I look forward to seeing how people reinterpret the blocks for their own tributes to the victims and survivors in Orlando. Once I gather blocks from my fellow guild members I’ll be sure to post some ideas for how to put all the blocks together, so stay tuned.
A Quilt for A Quilter
Wow, I can’t believe that it’s been over 3 years since I’ve posted anything here. Actually, I can believe it, because the last 3 years have been a bit of a whirlwind. New job, new city, new house…and while I have managed to squeeze in time at my machine here and there in the last few years, it’s been difficult. But I miss it, and decided recently to make an effort to get back at it.
I have been working at finishing some long-neglected WIPs, as well as starting (and finishing!) some newer projects, too. It feels good to actually have some finished projects to share. It’s been far too long! The quilt that I’m sharing today is from the second group; a newer project that was a priority so it was bumped to the front of the line.
First, some context:
My maternal grandmother, my “Nana,” has always been the quilter in my family. She took a class at some point in the early 80s and was hooked. It was from her that I learned fabric buying tricks such as “just get a yard if you love it!” and “it’ll just work in somewhere, you know?” Clearly, the absurdly large stacks of fabric in my house are her fault. :) I also learned from her to being brave and bold with colour combinations, to enjoy the process, and, maybe most importantly, to be social in my craft. For many, many years, when she and my grandfather lived in Kingston, she belonged to a quilt bee at her church that would quilt tops that people brought them, and the money they charged would go to charitable activities. Often, people would bring them a poorly constructed flimsy that they had found in an attic and the intrepid ladies would have to find a way to make it work!
During my undergraduate degree at Queen’s, when I was also living in Kingston, I would have dinner at my grandparents’ house every other Sunday. My Poppa would pick me up, and then Nana and I would sit and have tea and quilt, on either side of her large frame, while Poppa would fuss over whatever roast he had decided upon for dinner.
Nana has made her 2 daughters and 5 grandchildren a few quilts each, including special wedding quilts for both my brother and sister. She usually pieces her quilts on her vintage featherweight, and then she quilts them by hand. The hand-quilting has always been her favourite part of the process.
Last summer we were talking about her next project, and she admitted that there were some favourite stacks of fabric on her shelves that she didn’t think she would ever get to, in part because she was 88 (although I could frankly make a similar admission at 36), but also because her piecing just wasn’t what it once was. I offered to piece a few tops for her with her favourite fabrics, and then she could spend the winter quilting them.
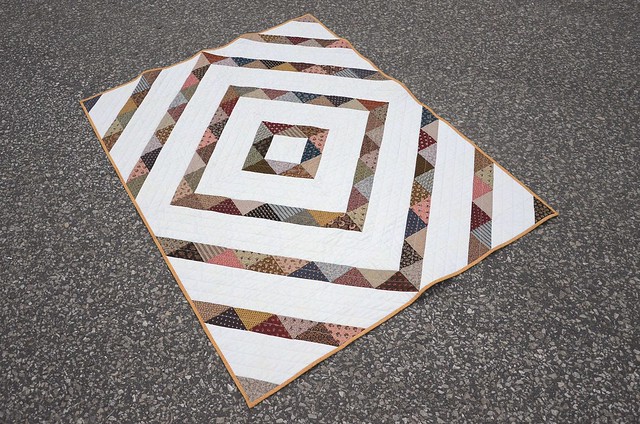
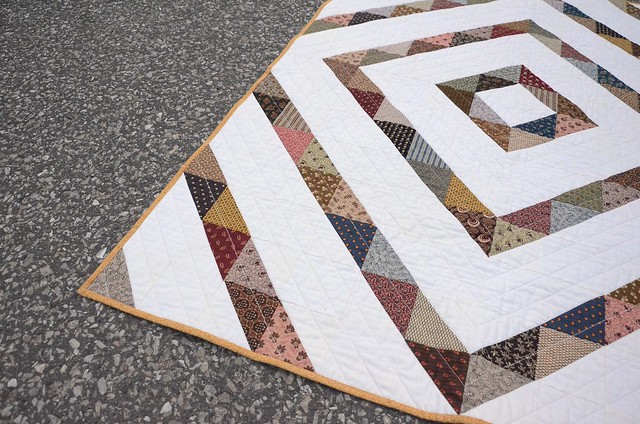
Well, the universe intervened, and in November she took a nasty spill and broke her right (dominant) arm and dislocated her right shoulder. She has since mostly recovered, but it is clear that her quilting days are behind her. So for her 89th birthday in April I finished up one of the quilts as a gift: the first time that she has been on the receiving end.
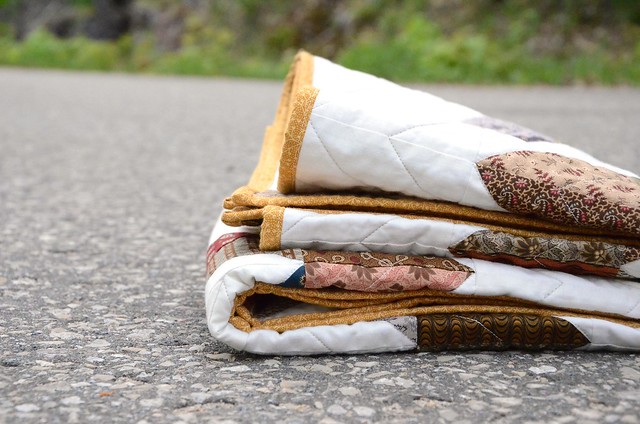
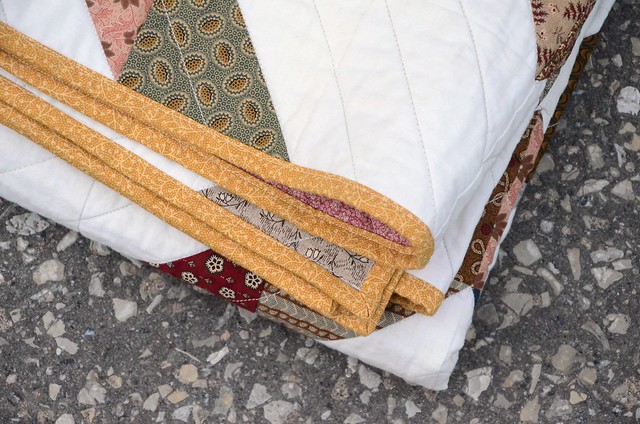
The colours are more her than me, but the design is more modern and minimal than what she would have done, so while it’s not the collaboration that I thought it would be, there is still a bit of both of us in it. And she’s thrilled with it!
Blerg.
If you’ve stopped by in the last few hours, and you’re wondering what the heck is going on, I’ve been auditioning new theme templates for the blog. And I can’t find one I like. So bear with me.
I also have a few new posts waiting as drafts. Yippee!
**UPDATE**
Well…it seems, after hours of trying to make some off-the-shelf themes work and failing, that I am going to have to dive into CSS Customization and create my own design. Double blerg.
To be honest, it’s been something I’ve wanted to learn for some time, and was on my “tackle this in 2013” list…and it’s 2013, so I guess there’s no time like the present! I’m generally pretty comfortable with trial and error plus Google, but if anyone knows some really great online resources I’d love to hear about them!
Stockinette
So tomorrow is November. Which means that Christmas is dangerously close. Dangerous because I have a few projects that I’d like to make as gifts and I’m not sure that I have enough time, and also because there are a few people (brother…father…) that are super difficult to buy / make for. I started an ideas list earlier today, and there are some people for whom I have enough ideas to last me 5 years of Christmases and birthdays. But the men? Eeesh.
There are also a few projects that I’d like to make for myself. You know, the decorating kind. I’d love to make a tree skirt, and a throw quilt for the sofa, and a few other bits and bobs. But if I’m being perfectly honest the things for me will likely have to wait for another year, since I have so many other things in the queue at the moment. Oh well! Next year!
One thing I DID get done (because I had a deadline in September…), was make a stocking!

The last week in August the team at Fat Quarterly tweeted that they needed some people to participate in the Designer Challenge for the Christmas 2012 issue, and I decided to throw my hat in the ring. I had never submitted anything to a publication before, but I’d been thinking about trying, so this seemed like a great place to start.

The fabric we were to work with is the line “Tinsel” by Maude Asbury for Blend Fabrics. Isn’t it cute? (I don’t currently have much use for cute Christmas fabric, but if I did I would be buying lots of those mittens. I love them!) And the only instructions were to design a stocking.
I must admit that my preference is for knitted stockings, perhaps because that’s what I grew up with, and so I wanted to design a stocking that riffed on that idea while still being a pieced fabric project. So I drew a couple of ideas out and finally settled on a design. It’s supposed to look like knitted stockinette stitches, hence the name.
I’m really pleased with how my project turned out, and I’m already working on a few other ideas to go with it. I figure I need at least two stockings in this house, one for me and one for Stella!

If you want to make a stocking using my pattern then go get a copy of the latest Fat Quarterly issue (Issue 11). Along with my project, there are some other fabulous stocking projects, some really gorgeous quilts, and even a tree skirt, just to name a few! (Who knows, I might even manage to get a bit further on my list this fall…)
And if you DO end up making my stocking then I’d love to see it, so be sure to add a photo to the Fat Quarterly Flickr group, as well as the thought & found Flickr group.
How about you, what’s on your homemade gifts project list this season? And do you have any gift ideas for a 26-year-old?!
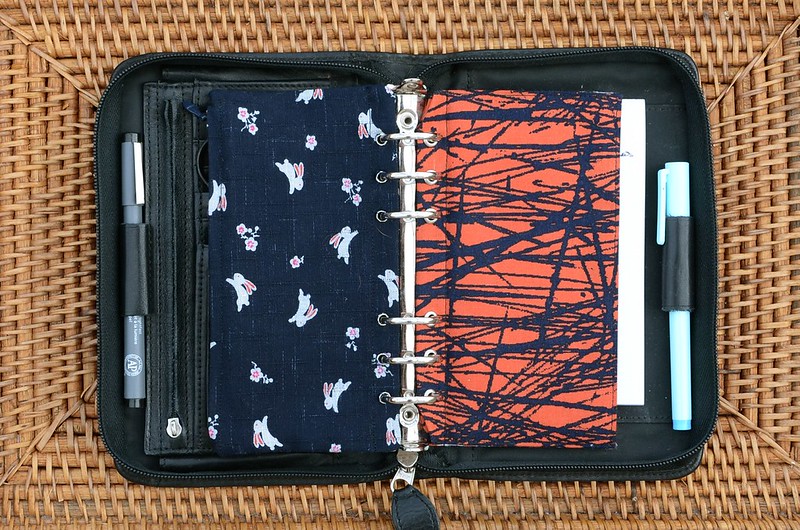
Travelling Handmade
Hello! If you’ve found me for the first time via the Travel Handmade post over on the Sewing Summit blog, then welcome! I really hope you enjoy the little project I’ve put together for you. :)
Earlier this summer I was cleaning off an old shelf in my office/studio, and I found my old Daytimer from highschool. I think I bought it around 1996, and it was the analog equivalent of an iPhone. It was my wallet, my address book, my to-do list, my sketch book, my calendar…it was ALWAYS in my purse. It was also a big splurge for me, since I bought a really nice leather one, and I think it cost me a little over $100. That was a lot for a 16-year-old to spend on a single item back then. Which is probably why I never threw it out.

When I found it again it occurred to me that while I no longer need it to organise my life, it would be a great way to organise all my little crafty tools for travelling! And so I began brainstorming some new inserts that would help me to keep things in order. I have two mini tutorials for you today, but I have lots of other ideas so hopefully there will be a few more to come in future!
(If you aren’t a pack-rat like me, and don’t have an old day planner kicking around the house, then visit your local thrift store. I see them there all the time!)
Needle Book
The first insert that I’ve designed is a needle book for keeping track of all the pins and needles you need to have along on any crafty trip.
Begin by cutting out a piece of fabric 8″ x 9″.

Fold in all four edges, wrong-sides together, 1/2″ all the way around, and press the fold with your iron.

Open the folds back up, and then fold the corners in so that the place where the two fold lines intersect are at the centre of the new fold.

Next fold the edges back down so that there is a nice point at each corner.

Take two pieces of cotton batting (I’ve used Warm & White here), each one cut to 6-7/8″ x 3-3/8″. Place them against the wrong side of the fabric, up against each 7″ edge. Sew around the perimeter to hold the batting in place.

Fold the needle book in half, and sew a line 1/2″ in from the fold line. Add 6 x 3/16″ grommets along the folded edge. (The package they came in has instructions on the back, as well as the necessary tools.) I marked the locations using one of the old pages as a template. And you’re done!


Zipper Pouch
I also thought it would be great to have a few little zipper pouches for holding some materials for different projects. I’m taking Katy’s english paper piecing class, for instance, so I’ll need a place to keep my papers and templates and fabric scraps!
Begin by cutting two pieces of fabric, 7 1/2″ x 4 3/4″ each. (I experimented with many options over the last week, and due to the scale of the final pouch, I decided that interfacing and lining and batting just made it too bulky, but of course you could add any of these things if you’d like.)

Sew the two long sides together using a 1/2″ seam allowance. Begin and end the seam with a regular stitch length and back stitching, but for the main length of the seam (about 7″) use a basting stitch. I used a stitch length of 4. Press the seam open.

Lay your zipper along the seam on what will be the inside of the pouch. Using your zipper foot, stitch along both sides of the zipper and across the bottom to hold it in place, at 1/2″ from the edge.

Pick out the basting and move the zipper pull to the centre of the opening, and then, sew across the other end, also at 1/2″ from the edge. Cut off the excess parts of the zipper. You will notice that I have removed the parts that normally stop the zipper at each end. I did this to keep the bulk to a minimum.

Fold the two sides of the pouch right-sides together, and sew around the other 3 sides using a 1/4″ seam allowance. Trim the seam allowance in the corners, and then turn the pouch right-side out through the opening at the top where the zipper was half open. Sew a line of stitches 1/2″ from the long edge opposite the zipper, and add 6 grommets, as you did for the needle book. And now you have a mini zipper pouch to keep things in!

I’m starting to add things to my travelling tool kit, and so far I have a seam ripper, these cute scissors, a pen, and water-soluble marking pen, my needle book and my zipper pouch, and a pad of graph paper for notes, lists and designs. I need to add some address cards to trade with all the wonderful people that I know I’m going to meet, and probably a few other goodies, too!


I hope you’ve enjoyed my little projects, and if you end up making either of these, I’d love to see them! You can add pictures to both my Flickr group and the Travel Handmade group.
And be sure to check out all the other wonderful projects and reviews that the lovely Sewing Summit organisers have ready for you!

Vintage Charms


This is not the first time I have posted an image of these charm squares. They are from my Nana’s stash…she had already made a quilt with some of them and didn’t think that she would be likely to use them for anything else, so she let me take them. I adore them. I have lots of precious fabric in my stash, but these are right at the top of the precious pyramid. Sure, the Heather Ross prints, and the bits and pieces from the original Flea Market Fancy, might be worth quite of bit on Ebay now, but they are still somewhat available – albeit at an extreme cost. But these are one-of-a-kind. I sincerely doubt I could ever find more if I wanted to. And so I have been unable to decide what to do with them.
When Kelly posted her idea about a My Precious Quilt-Along back in the spring, I intially thought I would finally get started on my Mendocino quilt. After all, I adore the fabric, and the pile I’ve collected over the last few years is worth a pretty penny. I figured I just needed to track down the few remaining prints that I’m missing and then I could get started. Well, I’ve been working on doing just that, but I’m still missing some odds and ends. So I looked through my stash for something else that I’m afraid to cut into. As soon as my eyes landed on my stack of vintage squares I knew this was the perfect opportunity to use them. After all, I’ll enjoy them far more in a quilt than in a pile, right? (RIGHT??!)

There is quite a range of lights and darks, as well as reds, blues and yellows, in the stack, so I wasn’t sure what to pair them with. I wanted to avoid just using Kona Snow, even though I find it the perfect white for vintage fabrics because it is ever so slightly yellow. It’s the Cloud White of the fabric world! (That’s a paint reference, for the uninitiated.) But I used Kona Snow for my Oh My Stars! quilt, so I wanted to branch out. I took them to a recent TMQG meeting, and it was suggested that I try using a selection of different warm, soft neutrals, rather than just one. I loved the idea, and it instantly reminded me of a project that Brooke had been working on, and which I adored.

Since I was seated at the central work table at the workroom at the time, I quickly turned to Karyn’s stacks of solid cotton fat quarters and grabbed a few from both Kona and Free Spirit. Then when I got home I hauled out my stash of neutral solids and added more to the pile. I couldn’t tell you what they all are, since some of them have been in my stash for years and years, but I know that Kona Solids in Snow, Bone, Ivory, and PFD Bleach White, Free Spirit Designer Solids in Pearl, and Art Gallery Pure Elements in Linen White are all in there.


I went through my stack of vintage fabrics, and quickly assessed the largest common size that I could get out of them. Some would allow as much as 5 1/2″, and some were closer to 4 1/2″, but I could get 5″ out of most of them, so that’s what I went with. Because my plan was to sew them into HSTs, and because those would require trimming after the initial sewing anyway, I didn’t bother to trim them to size. I cut out 5″ squares from my stack of neutrals, marked them with my diagonal sewing lines, and pinned them to my vintage charms.

Now, the other aspect of this project that I’m really excited about is that I’m going to sew all the HSTs as leaders and enders. Let me explain: I always use a scrap of fabric to finish off a chain when I’m piecing (an ender), and I leave it under the needle for when I begin my next chain of pieces (so that it becomes a leader). This ensures that my thread never jams up when I’m starting a new set of pieces, and it also conserves quite a bit of thread. So does chain piecing, which just means that I sew a bunch of pieces all at once by feeding them one after the other without cutting the thread in between. I decided recently that I was wasting effort by sewing over scraps of fabric at the end of every chain, and had the idea that I could have a project ready and waiting beside the machine, and that I could use as my leaders and enders instead of a random scrap. So, for instance, in the picture above I was working on the do. Good Stitches blocks that I posted about yesterday, and you can see that the chain begins with one of my HST sets, and the end of the chain is also an HST set which will be ready under the needle when I start again. Brilliant, right? (Yep, tooting my own horn!)
And it’s working, too! Without even trying I sewed 24 HST units last week, all in the process of working on other things. This quilt is going to make itself, I tell you. ;)

My original plan had been to arrange them all in the same direction, since I really wanted to highlight the individual prints rather than an overall quilt design…

…but since I’ve started playing with the HSTs that I’ve completed thus far, I’ve found some other options with promise. Thankfully I have lots of time to make a decision. ;)

And while I do all this work? Stella sleeps.
doing. Good
One of the things I really admire about the sewing community, whether online or elsewhere, is the willingness of its members to lend a hand. For years (actually, centuries would be a fair statement), sewers and knitters have provided blankets and hats and mitts to the charities in their community. A few years ago, when I first found Flickr and all the crafty people who used it, I loved how willing perfect strangers were to sew up a few blocks and ship them off to someone who was making a quilt for a friend who need support.
In the summer of 2010, Rachel at Stitched in Color started a new virtual quilting bee called do. Good Stitches with the goal of making quilts for people in need, and it didn’t take long for the group to grow quite large. At the moment there are 21 different groups involved, for a total of 210 people willing to chip in. I’ve been wanting to get involved for quite awhile, and finally filled out the wait-list form a few months back…April, I think?
I was thrilled when I finally heard that a new circle was being put together, made up of mostly Canadians in order to keep shipping costs low, and that I was invited to join in! Our host is the lovely Marika who blogs at Live, Laugh, Love… Sew, and she decided to call our new circle Happiness. (You can follow that link to our Flickr group to see what we’re up to each month.)
For our first month, Marika is in charge of the quilt we make, and she’s asked us to make wonky bento box blocks using raspberry, aqua, lime and solid grey. Despite the embarrassingly large size of my stash, I actually didn’t have much in the raspberry or lime department. I guess I need to go shopping. ;)

I had tons of fun making these blocks, and I love the way they turned out. I can’t wait to see how the finished quilt turns out. I’m sure it will be spectacular!
If you’re interested in getting involved, then head over to the Flickr group to read the rules, and fill out the wait-list form. And be sure to check out some of the finished quilts that the various circles have made over the last two years!
Tova I
I have always wanted to sew my own clothing. I’m 6′ tall, so off-the-rack has been challenging since sometime around age 14 (if someone can explain to me why companies like J.Crew make tall pants and tall coats, but DON’T make tall sweaters, I’d love to hear it…), but I’ve always been afraid to try making my own garments. Which is weird. Weird because I taught myself how to embroider while I was still in elementary school, and knit and quilt before I was 20. Weird because my Mum sewed most of her own clothes, and most of ours, while we were kids. Weird because I have always assumed that I can do anything when it comes to hand-work, provided I just go slowly at first.
But here’s the thing: screwing up a quilt block doesn’t waste much fabric, and only a little time. The same is true for embroidery, and simple knitting, like a scarf. But sewing a dress that doesn’t fit, or that you hate, or knitting a sweater that still isn’t long enough in the sleeve…well, that’s a big waste of time AND materials (and therefore $$$), and so I have always balked at this next obvious step in my hand-made education.
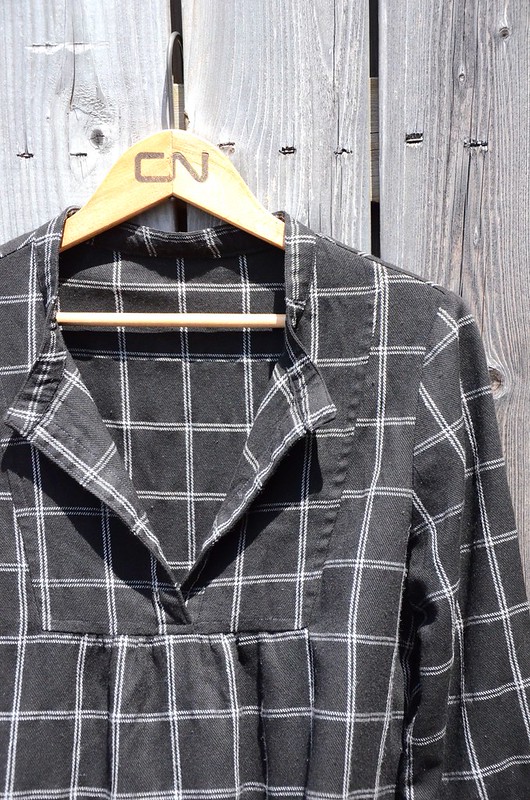
Sometime last winter I took a big step and actually bought two patterns: the Tova shirt and the Wiksten tank (alas, just before Jenny released the PDF versions, so I spent a bit more than you need to now). I had seen some lovely versions of both on Karyn’s blog, and by all accounts these patterns were easy for beginners and easily altered. And then they sat on my shelf.
Over Mother’s Day weekend Mum was down for a visit, and I had her help me get started. I didn’t really need help, per se, just moral support, but having her beside me gave me the push I needed to finally make a shirt. And you know what, it was easy! It turns out that you actually need to be far less precise when sewing a shirt compared with sewing a fussy quilt block, so it was no big deal.


That said, I do have some advice for those of you who have yet to make the leap. I bought a VERY cheap cotton/poly blend to start with, because I didn’t want to waste expensive fabric, but it was thick. Not the best choice for a first go at a new pattern. Also, it’s already starting to pill. Oh well, it will be a great cottage shirt for years to come. :) But I need to find a source of cheap muslin going forward, since I think it will be awhile before I feel confident in my alterations the first time through a pattern.
But if you’ve been hesitant, like me, to take the leap and sew some clothing for yourself, then hear this: you can do it! Really! I’m ready to cut out a Wiksten tank next, and I just bought Megan Nielsen’s Darling Ranges dress. I can’t wait to have a closet full of clothing that I made myself.
Now Stella needs to learn how to work a camera so that I can model it for you. ;)
Cutting Stripes On The Bias

When I posted about the baby quilt I made with vintage stripes, I had a few requests for a tutorial on how I achieved the matched bias stripes. I hemmed and hawed about how to do this, since I really didn’t want to post instructions that would allow people to make Allison’s Pow-Wow quilt without buying her pattern. That just didn’t feel right. So what I’ve decided is that I will show some quick tips about cutting the strips I used, but without any dimensions or instructions for putting the block together. I hope that everyone understands why I’ve chosen this course of action.
To start with, I really recommend starching the bejesus out of your piece of fabric. It should be as close to paper as possible. Seriously. Because you will be cutting your strips on the bias (45° in this case), they will be very prone to stretching and distortion as you pin and sew, and the starch will help to protect against that. It is also important to handle your strips quite gently for the same reason.
Once you’ve prepped your fabric, line up the 45° line on your ruler with one of the lower stripes. The more accurate you are with this, the more precise your final piecing will be. Begin by cutting off the bottom right corner.


Then repeat the same thing on the bottom left corner, such that you are cutting in the opposite direction from your first cut. How larger a corner you cut off will depend on how long a strip you require for your project. In the photo below I have cut to allow for an 8″ strip.


Now that you’ve set up your angles, you can begin to cut your strips at whatever width you require. If you need more than one pair then alternate which side you cut from so that you end up with pairs that are close to equal in length.

When you take one left-hand strip and one right-hand strip and place them together you’ll see that they line up!

You might notice that towards the top of the pair, it seems to slip out of alignment. This is because the stripes on my fabric weren’t perfectly straight. This particular sheet was well worn and hence thinner than new quilting cotton, so it was hard to avoid a bit of waviness. But if you are using new fabric, and you are careful to “press” instead of “iron,” you should get much more accuracy.
I hope this was helpful, and if you end up making something with these tips I would love it if you posted a picture in my Flickr group. I look forward to seeing what you come up with!
Playing With Stripes
A few weeks ago I learned that an old childhood friend had given birth to a baby boy, her first. And when I got an invite to the shower I knew that I had to make little Kiran something special. I tossed around some ideas for a few days, but nothing seemed right. Then I stumbled on this new quilt design by Cluck Cluck Sew, called “Pow-Wow.” And THAT reminded me of this Lauren Moffat fabric that I’ve been kind of obsessed with, as well as these stamps, which I pinned last fall, and which, it turns out, inspired Allison’s quilt, too!
Suddenly I had an idea that I really wanted to run with, so I pulled out a pile of vintage stripes from my stash and got to work.


Once I’d sewn up a bunch of chevrons, I strayed from the original plan for a minute. I thought they looked like the feathers on an arrow, so I played around with that, but ultimately decided that perhaps the new parents might not like weapon imagery…
I also really liked the idea of a colour wheel, but I’ve never pieced curves before, and thought that doing so for the first time on a last-minute gift might be asking for trouble. I think I’ll revisit it in future, though, because I love the way the mock-up looks! I just need to tackle a few test curves first. When I figured it out I’ll let you know!

Finally, I went forward with my original plan, and I’m pretty pleased with how it turned out!


I have no idea what the grey is, since it’s been in my stash a LONG time, but it’s close to Kona Coal. The backing fabric (unfortunately I only got the one crappy picture of it) is an Ikea print from 2007. I thought it matched the vintage sheets quite well! The binding fabric is a Cranston VIP print. And I’ve got lots of vintage stripes in the shop, if you want some. ;) I’m hoping to put some bundles together this week for anyone who’s interested, so stay tuned!


