Pinwheel Star
In case you haven’t figured this out yet, Thursday is the new Wednesday…at least as long as Monday through Wednesday insists upon being dark and gloomy. :( I can’t wait to land on the other side of the solstice, when the days will be getting longer rather than shorter. I love winter, but love it best when it is all bright white snow and clear blue skies, not this gloomy, rainy, grey business. Thank goodness I’m working with bright, cheerful fabrics! The vintage sheets that I’m using for this project are rather summery, and are doing a lovely job of brightening my cutting table. :)
This star uses the same construction technique as the basic sawtooth star, but rather than a single 6-1/2″ square in the centre there is a 6-1/2″ pinwheel unit made up of eight (8) half-square triangles (HSTs). For each star, you will need thirteen (13) pieces, and the dimensions for each star size are shown below:

Your pinwheel will be made up of two different fabrics. You can use one of your foreground prints and your background print, or you can use two of your foreground prints. In my example I used two foreground fabrics. In either case, you’ll have two (2) squares of each fabric. Start by marking the back of the squares from one of the fabrics, either with a single line down the centre, or a 1/4″ line on each side of centre. Then pin them to the other two (2) squares, right sides together.

Sew along the marked lines using scant 1/4″ seams. Each square will have two (2) stitched lines on it. Then cut down the centre between your two seam lines to produce two (2) separate pieces, for a total of four (4) HST square units.
Once you have pressed the units, you will be left squares that are a bit too big, so they will need to be trimmed down to 3-1/2″ | 2-1/2″ | 1-1/2″ (depending on which size star you’re working on) before moving on. It’s a bit time-consuming, but it will give you an opportunity to hit the reset button on any inaccuracies. (You can see the amount of extra in the comparison below.)

Once you’ve trimmed up the HST squares, lay them out so that they make a pinwheel. All the diagonal seams should come together in the centre, and the fabrics should alternate as you move around the block.

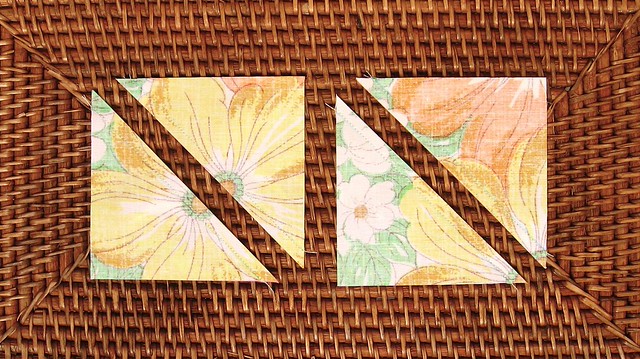
Sew the HST units together in pairs first, so that you end up with what looks like two scrappy geese blocks. At this stage (and my apologies, since I forgot to take a picture of this…), trim away some of the seam allowance fabric where the diagonal seams come together. This will help to avoid all the bulk in the centre when the whole pinwheel block is sewn up. Then join the two “geese” together for your finished pinwheel, which should be 6-1/2″ square.

Now join all your bits up according to the method used for the basic sawtooth star, and you’re done!

As always, if you have any trouble then post a comment, either here or in the Flickr group.
Finally, I just wanted to say how excited I am to see all the lovely pictures of fabric stacks and stars showing up in the photo pool! It really makes the work on my end worthwhile when I get to see what you guys are making with the tutorials, so keep posting! I know that some of you are just getting your fabric in order now, and need a bit of time to get caught up, so I’ll hold the next post for two weeks. Hopefully by then I’ll have some sunshine at the beginning of the week!


help …. the photo with the dimentions is not showing up for me :( all the other pictures are there but not the first one …….. is it possible to get you to email it to me or put it in out flickr pool? thanks, Sharon
I am ~so~ ready for some spring color and your tuts are simply marvelous !
Beautifully clear detailed photos. Very easy to follow. The first photos did not come up for me the first time I visited but have been there since. Joanne
Hi, I was just wondering when the next block will be available? thanks
I am all caught up on my stars and looking forward to the next pattern. You do such a great job with your instructions and the pictures you post to help us visual learners. Thanks!!! Having lots of fun and getting lots of compliments on my stars.
The first two stars (and their smaller versions) are completed. Anxiously awaiting the next ‘installment’. When will that be?