Travelling Handmade
Hello! If you’ve found me for the first time via the Travel Handmade post over on the Sewing Summit blog, then welcome! I really hope you enjoy the little project I’ve put together for you. :)
Earlier this summer I was cleaning off an old shelf in my office/studio, and I found my old Daytimer from highschool. I think I bought it around 1996, and it was the analog equivalent of an iPhone. It was my wallet, my address book, my to-do list, my sketch book, my calendar…it was ALWAYS in my purse. It was also a big splurge for me, since I bought a really nice leather one, and I think it cost me a little over $100. That was a lot for a 16-year-old to spend on a single item back then. Which is probably why I never threw it out.

When I found it again it occurred to me that while I no longer need it to organise my life, it would be a great way to organise all my little crafty tools for travelling! And so I began brainstorming some new inserts that would help me to keep things in order. I have two mini tutorials for you today, but I have lots of other ideas so hopefully there will be a few more to come in future!
(If you aren’t a pack-rat like me, and don’t have an old day planner kicking around the house, then visit your local thrift store. I see them there all the time!)
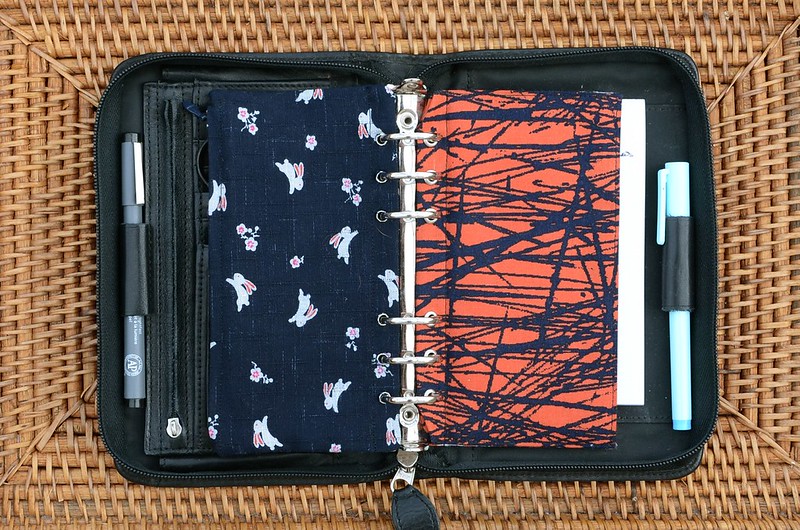
Needle Book
The first insert that I’ve designed is a needle book for keeping track of all the pins and needles you need to have along on any crafty trip.
Begin by cutting out a piece of fabric 8″ x 9″.

Fold in all four edges, wrong-sides together, 1/2″ all the way around, and press the fold with your iron.

Open the folds back up, and then fold the corners in so that the place where the two fold lines intersect are at the centre of the new fold.

Next fold the edges back down so that there is a nice point at each corner.

Take two pieces of cotton batting (I’ve used Warm & White here), each one cut to 6-7/8″ x 3-3/8″. Place them against the wrong side of the fabric, up against each 7″ edge. Sew around the perimeter to hold the batting in place.

Fold the needle book in half, and sew a line 1/2″ in from the fold line. Add 6 x 3/16″ grommets along the folded edge. (The package they came in has instructions on the back, as well as the necessary tools.) I marked the locations using one of the old pages as a template. And you’re done!


Zipper Pouch
I also thought it would be great to have a few little zipper pouches for holding some materials for different projects. I’m taking Katy’s english paper piecing class, for instance, so I’ll need a place to keep my papers and templates and fabric scraps!
Begin by cutting two pieces of fabric, 7 1/2″ x 4 3/4″ each. (I experimented with many options over the last week, and due to the scale of the final pouch, I decided that interfacing and lining and batting just made it too bulky, but of course you could add any of these things if you’d like.)

Sew the two long sides together using a 1/2″ seam allowance. Begin and end the seam with a regular stitch length and back stitching, but for the main length of the seam (about 7″) use a basting stitch. I used a stitch length of 4. Press the seam open.

Lay your zipper along the seam on what will be the inside of the pouch. Using your zipper foot, stitch along both sides of the zipper and across the bottom to hold it in place, at 1/2″ from the edge.

Pick out the basting and move the zipper pull to the centre of the opening, and then, sew across the other end, also at 1/2″ from the edge. Cut off the excess parts of the zipper. You will notice that I have removed the parts that normally stop the zipper at each end. I did this to keep the bulk to a minimum.

Fold the two sides of the pouch right-sides together, and sew around the other 3 sides using a 1/4″ seam allowance. Trim the seam allowance in the corners, and then turn the pouch right-side out through the opening at the top where the zipper was half open. Sew a line of stitches 1/2″ from the long edge opposite the zipper, and add 6 grommets, as you did for the needle book. And now you have a mini zipper pouch to keep things in!

I’m starting to add things to my travelling tool kit, and so far I have a seam ripper, these cute scissors, a pen, and water-soluble marking pen, my needle book and my zipper pouch, and a pad of graph paper for notes, lists and designs. I need to add some address cards to trade with all the wonderful people that I know I’m going to meet, and probably a few other goodies, too!


I hope you’ve enjoyed my little projects, and if you end up making either of these, I’d love to see them! You can add pictures to both my Flickr group and the Travel Handmade group.
And be sure to check out all the other wonderful projects and reviews that the lovely Sewing Summit organisers have ready for you!


What a fantastic idea! I have several Day-planners in 3 different sizes that I have not been able to part with. This would be so handy for when I am riding in the car!
I would love to find a larger one (I’ve been keeping my eyes peeled at my local thrift stores for a nice leather one) so that I could even make an insert for my Kindle, and a few other bigger items!
What a really excellent idea! That’s really clever.
That is a great idea. I still have my daytimer too, circa 1998 or so. Nameplate and all!
What a lovely way to upcycle something that you hadn’t used in a long time – the inserts look simple enough to make that you could switch them out whenever the mood struck. :)
What a great idea! Now I have one of these somewhere…!
What an awesome idea!
Wow, I love that! I have one of those sitting around and it’s be great to put it to such good use :)
what a great idea, you up-cycle and keep memories going !
what a wonderful idea to up-cycle a loved item and to keep memories going!
i love this! thank you!
Fantastic idea! I have a spare plastic folder I wasn’t using….. guess I will be soon!
It also occurs to me that if you put your zip off centre on the zip pouch it would lie flat inside rather than perpendicular and be less bulky? No time to experiment today. Friday. I can fiddle on Friday.
I think I just tossed my daytimer …shoot. Great idea!